Shot VeryfierShot Veryfier LT

quick start

Shot Veryfier includes 
precision and silhouette modes

Shot Veryfier is simple and intuitive. To start you dry-fire drill with Shot Veryfier you only have to complete a couple of steps described below. If you want to operate within the Shot Veryfier in a more sophisticated way, for example to simulate sports shooting scenarios, please explore the self-explaining options in the Settings menu.

Do not hesitate to contact us anytime via email if your drill stocks or if you have any questions.


precision mode - silhouette mode

1
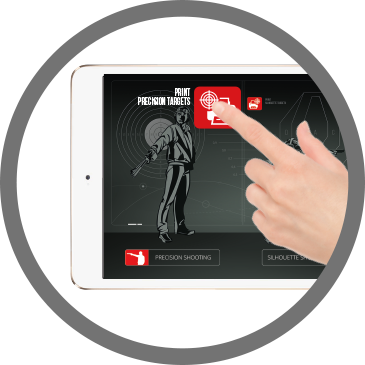
Start the App. Bevor You begin the drill You would print the targets. Press the PRINT PRECISION TARGETS button.
2
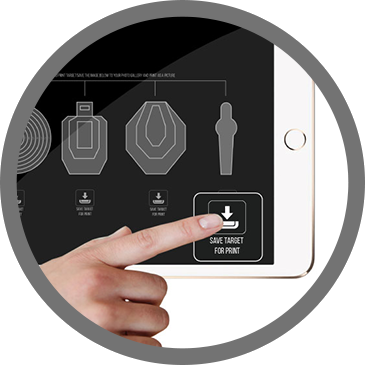
In the SAVE AND PRINT TARGETS menu, select and save the targets to your photo library. Print them in the usual way you print files. Please do not use reflective or shiny paper.
3
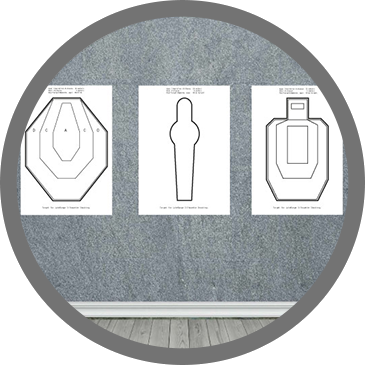
Fix the printed target to the wall. Please avoid placing it under or in front of direct light sources. Avoide the use of bright or shiny environments and reflective duct tape to fix targets to the wall.
4
Place your iPad in front of the target at the distance of approx. 1-3 meters. Launch Shot Veryfier in the PRECISION SHOOTING Mode. We recommend using a camera tripod with the iPad mount unit.
5
Align the device target with the real one. It is helpful to aim your IPad in such a way that the real target is located in the middle of the screen. Pinch to resize, or swipe to move the device target. Use the ZOOM buttons to scale your real target.
6
When ready, start your drill by pressing the SHOOT button. By default, the drill ends after 10 shots or after 30 seconds.
7
Practice your drill. During the drill you will be able to see the laser hits on the target and to see the score after each shot. The further drill details will be displayed in real time in the upper left corner.
8
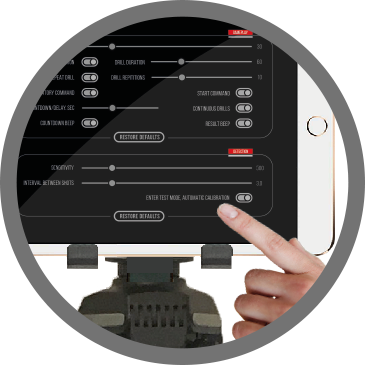
IMPORTANT! In case of poor recognition of laser hits on the target (for example if you operate low powered laser training aids with output power of appr. 1 mW) proceed to SETTINGS and scroll down to DETECTION. Enter mode for AUTOMATIC CALIBRATION.
9
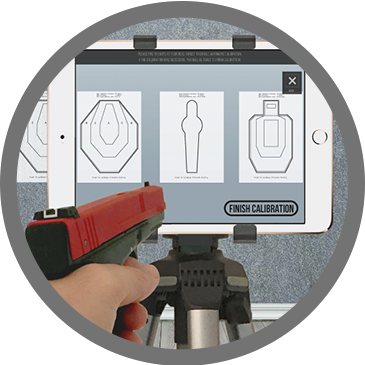
Make several shots on your target till the button FINISH CALIBRATION appears in the right lower corner of the screen. Press on the button FINISH CALIBRATION and proceed to SHOOT MENUE to continue your drill.
10
When the drill ends, the score sum of your drill appears. Press the arrows in the upper left corner to get detailed informations, such as the drill duration, split times, and the score of each hit. Press the SHOOT button to restart or press the SETTINGS to customize your drill.
11
In the SETTINGS you can adjust the number of shots per target, the drill duration, the countdown settings and the number of drill repetitions. You can switch the voice commands and acoustic signals on and off, and tune the sensitivity of laser hit recognition.
 

precision mode - silhouette mode

Operating Shot Veryfier in the SILHOUETTE mode basically differs from the PRECISION mode, but remains as simple and intuitive. In the SILHOUETTE mode you can operate with up to 6 targets at once or set different hit zones for one target. If you want to operate the Shot Veryfier in a more sophisticated way, please explore the self-explaining options in the SETTINGS menu. Do not hesitate to contact us anytime via email if your drill stocks or if you have any questions.

1
Open Shot Verifier. Bevor You begin the drill You have to print the targets. Press the PRINT SILHOETTE TARGETS button.
2
In the SAVE AND PRINT TARGETS menu, select and save the targets to your photo library. Print them in the usual way you print files. Please do not use reflective or shiny paper.
3
Fix up to 6 printed targets to the wall. Please avoid placing them under or in front of direct light sources. Try to avoid bright environments and usage reflective duct tape to fix targets to the wall.
4
Place your iPad in front of a target at the distance of approx. 2 meters. Launch thr app in the SILHOUETTE SHOOTING MODE. We recommend using a camera tripod with the iPad mount unit.
5
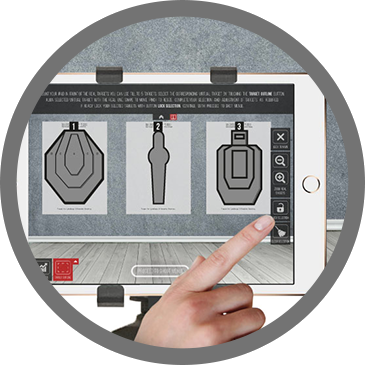
Aim your iPad on the real targets. Select the corresponding target outline by pressing the TARGET OUTLINES pop up menu. Place the target outline over the real target and align both. Pinch to resize, swipe to move the device target.
6
Each target outline will be marked with a number in order of selecting outlines. After you finish target aligning, lock the targets by pressing the LOCK SELECTION button and press the PROCEED TO SHOOT MENU.
7
The SHOT MENU has two operational modes: the IMMEDIATE START MODE and the CALL TARGETS MODE. By default, the SHOT MENU is set to IMMEDIATE START. You can also adjust the DURATION and the NUMBER OF SHOTS in this mode. The IMMEDIATE START MODE allows you to practise your drill linear during the set duration.
8
If you select the CALL TARGET MODE, targets will be called randomly. In this mode you can set the par time for the period after the target is called, and the number of calls. Press SETTINGS button to set further parameters for your drill, such as the target behavior, timer options and acoustical commands.
9
Start your drill by pressing START SHOOTING button. If you practise with default settings, you can pause anytime by pressing the STOP SHOOTING button. If you are working with customized parameters, the drill will stop automatically after the set values have been achieved.
10
IMPORTANT! In case of poor recognition of laser hits on the target (for example if you operate low powered laser training aids with output power of appr. 1 mW acc. to European regulations) proceed to SETTINGS and scroll down to DETECTION section. Enter mode for AUTOMATIC CALIBRATION.
11
Make several shots on your target till the button FINISH CALIBRATION appears in the right lower corner of the screen. Press on the button FINISH CALIBRATION and proceed to SHOOT MENUE to continue your drill.
12
After pausing the drill you can examine the results and expand the detailed settings by pressing the time sheet icon in the upper left corner of the screen. Pressing CLEAR SCREEN to proceed back to the shot menu.
13
Shot Verifier offers a wide range of settings in the SILHOUETTE SHOOTING mode. You can adjust the timer option settings, activate the reload option for calling an acoustic command after a set number of shots, elaborate the call target options defining when the targets should be called, adjust the target down option settings for target behavior, and optimize the camera recognition settings to fit iPad to different laser training aids.
NEW. SHOT VERYFIER LT V2.0
MAJOR UPDATE.

Optimized performance for iPhone 7, 7+
and iPad Pro.

New recognizer reworked from scratch for
significant improvement of laser impulse
recognition.

Automatic camera calibration for use with
different lasers.

New target adjustment with geometrical
compensation of distorted targets.

More precisely recognition accurate to 0,003 mm.

New more ergonomically and easier to use interface design.

DRY FIRE LASER TRAINING FOR iOS DEVICES
NEW. SHOT VERYFIER LT V2.0
MAJOR UPDATE.

Optimized performance for iPhone 7, 7+

Significant laser recognition improvement

Automatic camera calibration

New target adjustment

More accurate recognition

New interface design